
When I redesigned my home to be more Montessori-aligned, one of the biggest changes was setting up an open and accessible art corner where my toddler has the freedom and autonomy to select and use any of the supplies present to create her own artworks.

At the start, there was mess and misuse of the art resources. I observed, learnt and made refinements to keep the mess manageable, enable easier clean-up of the art space, and found ways to encourage my toddler to exercise proper care and use of the materials.
A couple of months down the road, I don't regret my decision to set up this Montessori-inspired art corner at all. I derive immense joy and pride in seeing my toddler immerse herself in art and craft everyday, usually on her own initiative, and I see her shoulder more responsibility with using and keeping the art materials.

Note: Our Montessori-inspired art corner is by no means perfect and doesn't look organised and orderly all the time. The reality is that there IS still some degree of daily mess (and waste) from the art and craft activities. I'm sharing my experience and recommendations here hopefully to inspire and provide ideas to caregivers who're considering to introduce a dedicated art corner to young children.
The Setup: Our Montessori-inspired Art Corner
Our dedicated art space consists of the following:

- Art shelf, bottom row of our IKEA Billy Bookshelf
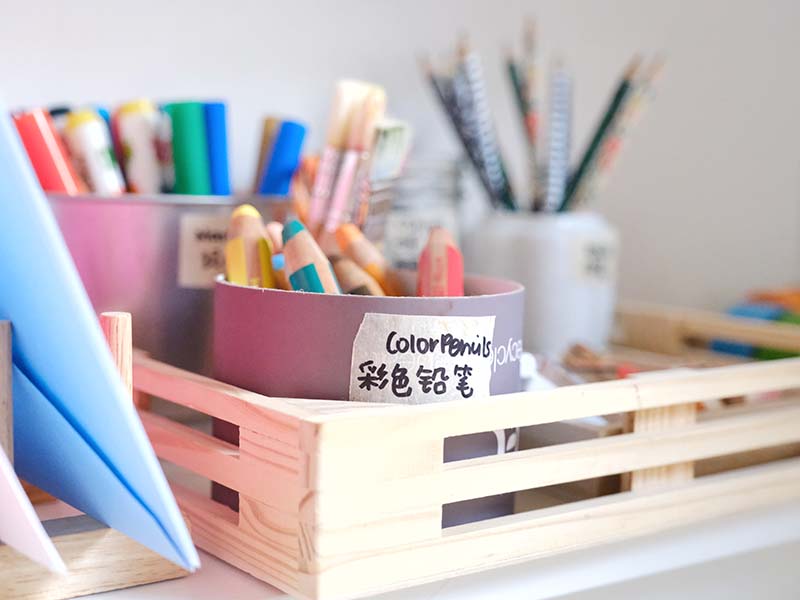
Leftmost, I have a Daiso wooden rack for holding A4-sized colored construction paper and white printer paper. In the middle, I have a large wooden crate holding Jar Melo washable markers in an IKEA SOCKER plant pot as well as small glass jars holding respective items -- Honeystick crayons, Stabilo woody color pencils, Melissa & Doug rubber stamp set, Fiskars shape punchers, scissors (Crayola blunt tip scissors & IKEA MALA scissors set), and pencils. To its right, there are two small wooden crates holding colorful painter's tape. Finally to the extreme right, there is a pack of wet wipes for wiping of hands and clean-up.
(Note: This variety can be overwhelming for a young child's first exposure to an open and accessible art space. Start with 3-4 types of art materials, and gradually add more when your child is receptive and has mastered use of existing resources.)
On the side of the shelf, there is a 3M hook for my toddler's art apron. She used it all the time in her young toddler days, but has less use for it these days as an older toddler. This is because she has significantly better fine motor skills now and has gotten more aware about keeping her clothes and body clean.

- Trolley cart from Michael's, middle section dedicated to art and craft supplies -- Crayola washable paints, container with nature loose parts, homemade play dough and a play dough tinker box.

- IKEA flisat table, located right next to the art shelf and trolley cart. This close proximity sets my toddler up for success in proper management and usage of her art materials because one, she has a defined 'work station' to explore the resources and create artworks and two, she covers less distance while holding art materials (therefore less chance of spillage/scattering things).


- DIY cardboard house, with freezer paper lining the inside walls. This white freezer paper is intentional as drawing canvas for my toddler. I re-direct my toddler to freely create art on these walls when I find her inappropriately drawing on furniture, saying something along the lines of, "I see you're in a drawing mood, let's go to your cardboard house to doodle all over its walls! This xxx needs to be kept in its original condition, so drawing is not allowed here."
How to Encourage Proper Use of Art Materials
Select art materials that are easy to use from children's perspective. Eg instead of introducing liquid glue with a brush for your child's first glueing activity, try a glue stick. It’s less messy and easier to manage. Once children understand how glueing works, they would be able to understand how to work new glueing materials and be less inclined to misuse them.
Model, model, model... repeated demonstrations are important. Through observation children see us modeling the use of materials and may seek to emulate the same. Frequent exposure to art materials would help children understand the activity cycle and responsibility of using those materials.
How to Engage Young Children in Art
- Set your expectations on attention span. It’s totally normal to lose interest quickly with some activities and attention span does vary a lot with different activities. It takes time to figure out what holds your child’s interest or what fits the skills your child is trying to master. For instance, my toddler can cut painter's tape for half an hour but do a painting activity for just 5 mins.
Also be realistic with the age of the child. 15 mins probably equates to an hour in toddler play time. It is key to provide plenty of play experiences and in time children will engage more. Moreover, what doesn’t work today might very well work the next day.
Limit intervention to encourage open-ended self-expression. We should focus on teaching the art technique or introducing the child to a new medium/material, and let the child combine them on her own to express himself/herself through this new art form. I don't specify an end-outcome with art and craft activities and refrain from being instructional. I remind myself to focus on the process art, not the destination.
Opt for fewer but higher-quality art materials. When the materials work as intended (e.g. scissors cuts well, marker ink flows smoothly), this builds up the interest to explore further and results in less frustration (and a tendency to give up) for the child.

How to Keep Materials Orderly
Model keeping the materials after use, and encourage your child to help with that. Over time, the child understands that keeping of the materials is part of the activity cycle and works towards completing that step as well.
Compartmentalise everything -- all materials have their own containers/trays. Labelling the containers/trays (idea from Chalk Academy) helps children recognise what belongs where, and boosts pre-literacy skills.
Have a little 'waste basket' at the work station for discarding things such as pencil shavings, paper cuttings etc.
How to Limit Waste
If you find that children are not doing the activities right (eg smearing glue all over/scattering items), it might signal that they are seeking other activities that align to other developmental needs/play schemas, e.g. trajectory (movement) schema. Try switching gears and take care of your child's current need to move items in and out of containers (eg set up a water pouring station). Keep the misused art materials for a while and reintroduce at a later time when children might be ready for them.
Set aside containers for storing paper scraps. These small bits can be repurposed for another art and craft activity or used as confetti for an event (I did so for my toddler's second birthday).
Encourage children to use both sides of paper for drawing. You could also cut up unused paper bags to serve as large drawing canvases for children.
For markers that no longer work as well as they did, save them for sink play activities (to tint the water). Hello, Wonderful has a brilliant idea for recycling markers into watercolor paint.

How and Where to Store Art
The "Keep / Display / Recycle" principle is something I learnt from Play at Home Mummy (she has a better term for this, but I can't find the exact terminology she used!)
With each piece of completed artwork, I ask myself this question, "What does this artwork mean to me/my child?" and assess its value.
Keep: This is when I feel that the artwork is something I would love to review again in the future, to look back on my child's art progress and developmental stages. I save 'regular' artworks by pasting them into a sketch book, writing down the dates, and add one or two lines if there's a story behind the artworks / I wish to explain something about the artworks.
Display: This is when the artwork is special or has great aesthetic appeal, for instance the first time my toddler drew a family portrait or did an artwork in a new medium/with a new technique. I frame the delicate pieces up (e.g. glued artworks) or put them as they are on the fridge, or onto a display board in our living room.
Recycle: This is for the artworks that don't belong to the aforementioned categories. I take off any embellishments that aren't recyclable, and place the paper in the recycling bin.
Inspiration for Open Art Spaces at Home
These two Montessorian moms share invaluable experiences and tips for setting up open and accessible art spaces at home for their children:
Whether you plan to set up an open and accessible art space at home, I hope your child loves and benefits greatly from any form of art exposure you nurture at home!
To follow our play adventures, follow our Instagram, Pinterest or Facebook Group.
